FAQS
General Style
How to Change Font Style ?
Step 1:
Go To _fonts.scss (assets/scss/custom/fonts/_fonts.scss )
if you want to change another font-family Go to the site Google Fonts And Select One font Family and import In to style.css file
How to Select font Family
Example:
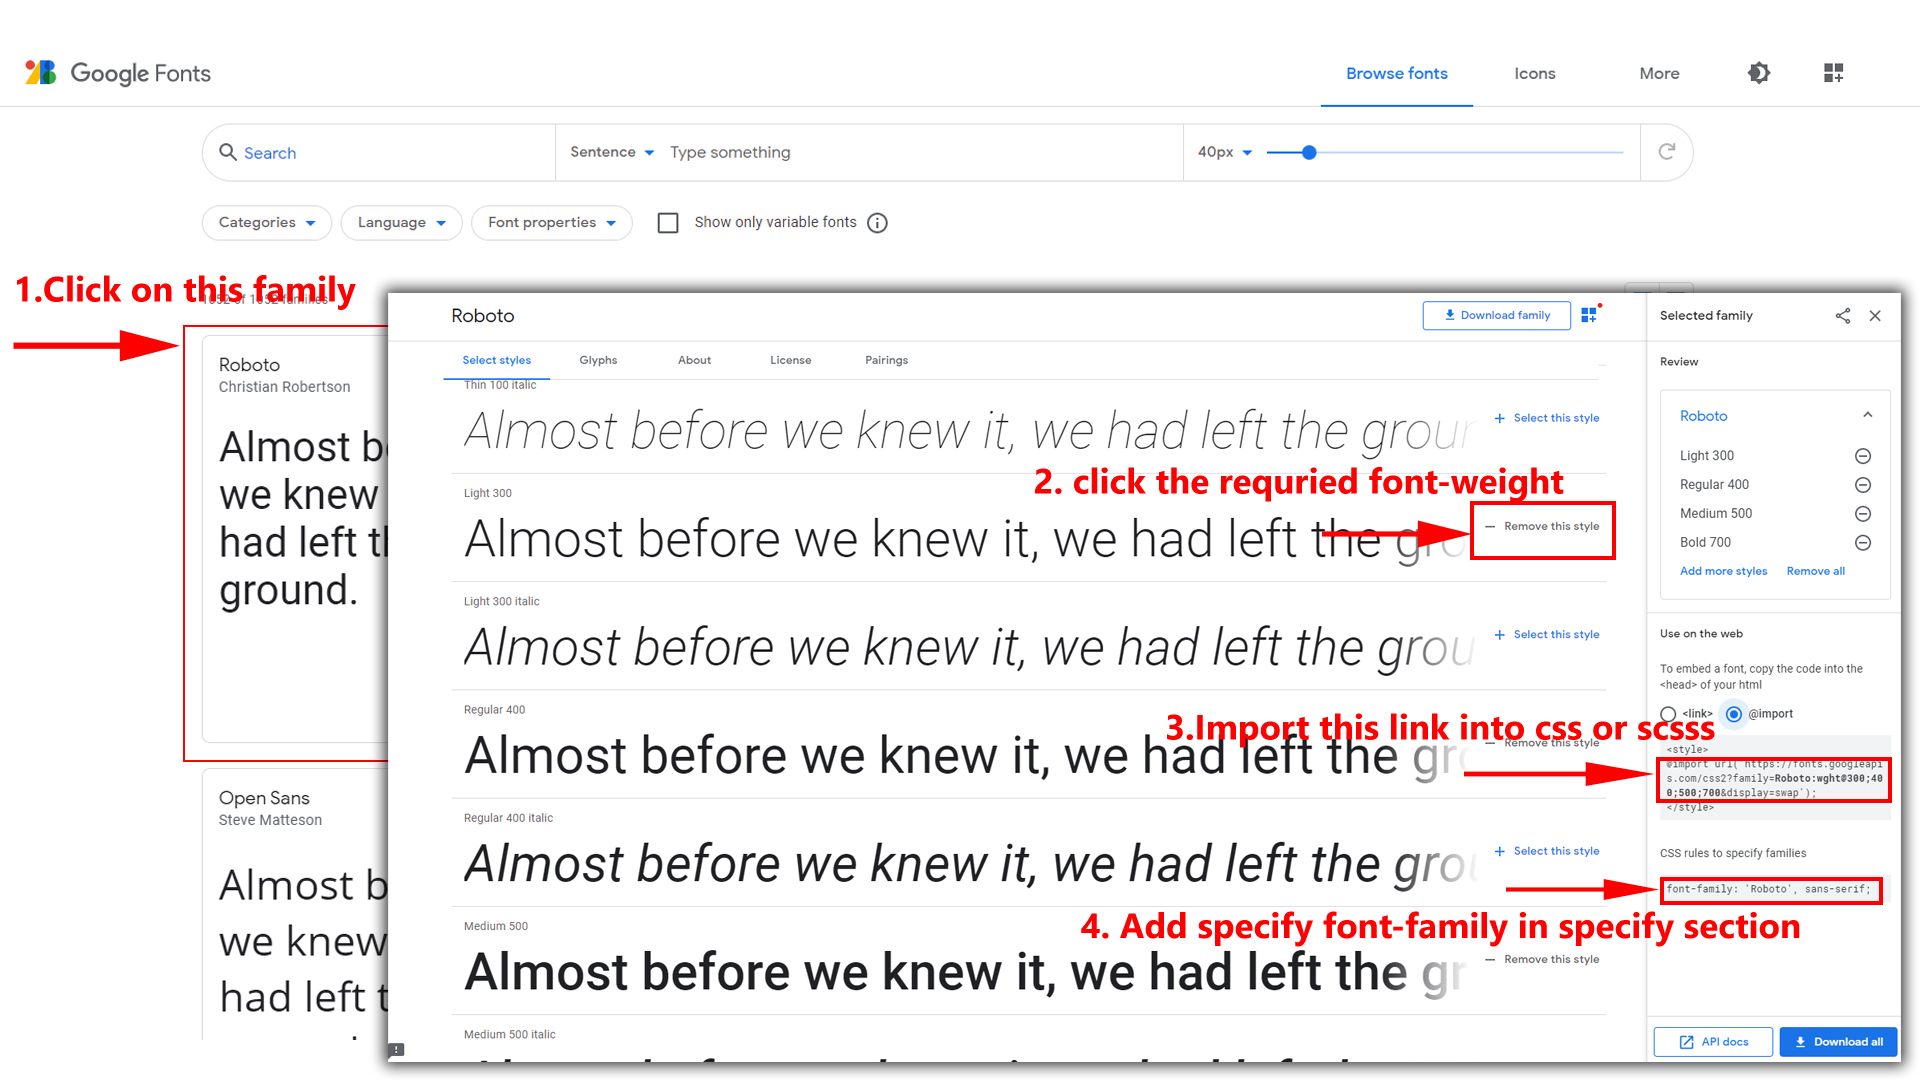
Step 2:
And paste Your Selected font-family in _fonts.scss
Example:
@import url("https://fonts.googleapis.com/css?family=Roboto:300,400,500,700,900");
Step 3:
And add the Your Selected font-family in _bootstrap-styles.scss(assets/scss/bootstrap/_bootstrap-styles.scss)
Example:
body {
	margin: 0;
	font-size: 14px;
	font-weight: 400;
	line-height: 1.5;
	color: #3f3e50;
	text-align: left;
	background-color: $background;
	font-family: 'Roboto', sans-serif;
}
Note : After Changing font you must run gulp command i.e, gulp watch . Refer gulp page for more gulp commands click here.
How to Change Logo ?
Go To "assets/images/brand" folder and replace your logo with Previous Logos within in image size. note: Please don't increase logo sizes. Replace your logo within given image size. otherwise the logo will not fit in particular place it disturbs the template design.
How to Enable RTL Version
How to Enable RTL Version?
Please follow the bellow steps to enable RTL Version
Step 1 :
To enable RTL Version you have to open custom.js and admin-custom.js ({assets/js/custom.js}, {assets/js/admin-custom.js}) file and remove comments for rtl as shown in below
									// ---------------Start RTL-----------------//
									// $('body').addClass('rtl');
									// ---------------End RTL-----------------//
Step 2 :
Remove the comments to enablertl as shown below
											// ---------------Start RTL-----------------//
												$('body').addClass('rtl');
											// ---------------End RTL-----------------//
Theme Styles
How to Enable Dark Theme?
Please follow the bellow steps to enable Dark Theme
Step 1 :
To enable Dark Theme you have to open custom.js and admin-custom.js ({assets/js/custom.js}, {assets/js/admin-custom.js}) file and remove comments for dark-mode as shown in below
										// ---------------Start Dark-mode-----------------//

										// $('body').addClass('dark-mode');
										// ---------------End Dark-mode-----------------//
Step 2 :
Remove the comments to enabledark-mode as shown below
										// ---------------Start Dark-mode-----------------//

										$('body').addClass('dark-mode');
										// ---------------End Dark-mode-----------------//
How to Enable Light Theme?
Please follow the bellow steps to enable Light Theme
Step 1 :
To enable Light Theme you have to open custom.js and admin-custom.js({assets/js/custom.js}, {assets/js/admin-custom.js}) file and remove comments for light-mode as shown in below
										// ---------------Start Light-mode-----------------//

										// $('body').addClass('light-mode');
										// ---------------End Light-mode-----------------//
Step 2 :
Remove the comments to enablelight-mode as shown below
										// ---------------Start Light-mode-----------------//

										 $('body').addClass('light-mode');
										// ---------------End Light-mode-----------------//
How to Enable Transparent Theme?
Please follow the bellow steps to enable Transparent Theme
Step 1 :
To enable Transparent Theme you have to open custom.js and admin-custom.js({assets/js/custom.js}, {assets/js/admin-custom.js}) file and remove comments for Transparent-mode as shown in below
										// ---------------Start Transparent -mode-----------------//
										// $('body').addClass('transparent-mode');
										// ---------------End Transparent-mode-----------------//
Step 2 :
Remove the comments to enablelight-mode as shown below
										// ---------------Start Transparent -mode-----------------//
											$('body').addClass('transparent-mode');
										// ---------------End Transparent-mode-----------------//
How to change any chart color according to your theme color?
By default, the chart color will change based on the theme color.
You can replace the default chart with your own chart, but in order to change the colors of your chart with respect to the theme colors you have to follow the below steps.
How to replace your own chart with existing chart and change colors of that particular chart in Dashboard Page ?
Note: This process is only for replace your own chart in index.html page
Step1:
Go to root path: assets/js/index1.js in that js file you will find a function named as index " function sales(); " inside of that function replace the old chart js data with your new chart js data, in order to change your chart color according to your themecolor then add " myVarVal" (Ex:- myVarVal to that particular color field based on your requirement.
Step2:
Navigate to root path: assets/js/ and open themeColors.js in that js file you will find a function called "(function names() )" In that function you will find
											if(document.querySelector('#sales-status') !== null){
												sales();
											}
Then change it's id name based on the id that you've used for your particular chart.
Ex: How do I modify the Id in the "themeColors.js" file?
-
Before :
  " if(document.querySelector('#sales-status') !== null){
												sales();
											}"
After :
 " if(document.querySelector('# your chart id') !== null){
																sales();
														}"
How to add your new chart and change colors of that new chart according to your themecolor in Other Pages ?
Note : This process is only for adding your new chart to other pages.(Skip this process if this is not your requirement)
If you want to change the color of your chart with respect to the themecolor you have to follow the below steps.
Step 1:
If you want to add any chart to any other page then follow the below process.
Open js file of the particular chart that you wanted to add, in that js file (for example in my case: mychart.js), and inside of that js file create a new function with " unique " name (for example in my case: myFunction() ), and then place the chart js content inside of that function.
Note: If there is more than one chart then you need to create different functions for different charts respectively.
Ex-1: myFunction1() {
chart js1 content
}
Ex-2:
myFunction2() {

												chart js2 content

											 }
Step 2:
Navigate to root path: assets/js/themeColors.js in that js file you will find a function called "(function names() )" In that function you will find
 "if(document.querySelector('#sales-status') !== null){
											sales();
										}"
Below this condition add a new condition with the "id name and function name" that you've used in your chart js (Ex: mychart.js)
Ex: " if(document.querySelector('# your chart id') !== null){
myFunction(); =>created function for the above id
}"
Step 3:
If you want to change your chart (Ex: mychart.js) color according to your themecolor then follow the below process
Ex : Go to root path: assets/js/mychart.js in that js file you've already created a function (Ex: myFunction() ) inside of that function there are different color values based on the chart. so, if you want to change the color then add " myVarVal " value (Ex:- myVarVal )to that particular color field based on your requirement.
How to enable switcher in any page ?
Switcher
Note:- The switcher-1.html and switcher-2.html pages are displayed in pages in web in dashboard
How to Enable Styles for switcher?
Please Follow the below steps
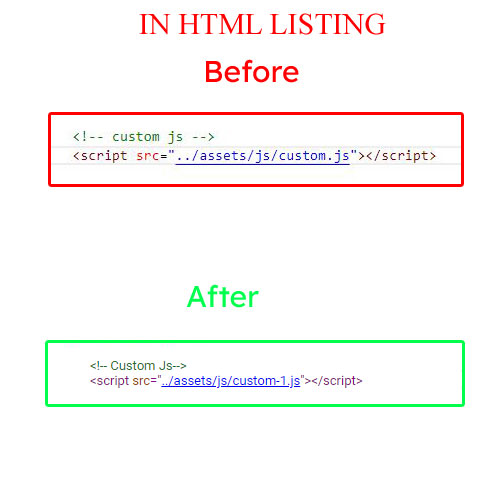
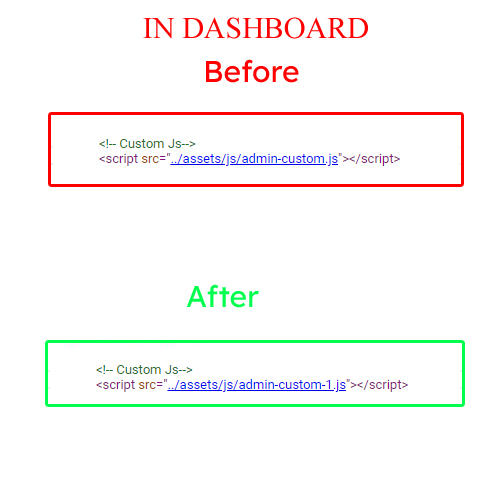
Step1:
Open HTML file in Script Section change your custom.js to custom-1.js style link in html ,admin-custom.jsto admin-custom-1.js style link in dashboard . check below Image
To enable the switcher then you must have to place below HTML, CSS, JS in your html page.
Below HTML is in empty.html file